Sharpening
OK, let’s get started. The edge angle, or the angle that the blade is sharpened at, is dictated by what you plan to use the knife for. There is no set rule as to what angle you have to sharpen
your knife, but a good guide line is sharpen most of your working knives at about 20 degrees on each side of the blade to give you about 40 degrees. Many of the newer knives of today are used by more demanding chefs and at home by those that demand a very sharp edge and are sharpened around 16 degrees per side. This is a delicate edge, especially on a thin and harder blade but cut extremely well. Care needs to be taken with such an edge however.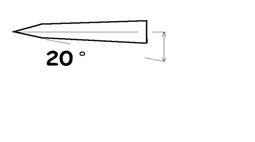 20 degrees will give you a durable edge for most chores.
A very popular practice is to
grind the blade at 15 degrees or less until you are nearly to the edge and then finish
at about 16 to 19 degrees. This makes for a very keen and yet durable edge.
The straight razors were
sharpened at a very thin angle and were made with the sharpening guide built
into the design of the blade. In other words the back of the razor was forged
thicker on the very spine of the blade so that the blade could be laid down flat
on the sharpening stone with both the edge and the spine touching the stone.
The spine held the edge at the proper angle to the stone for sharpening. Slick
huh?
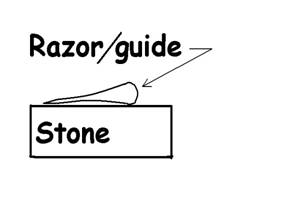
This feature is not incorporated
into other knives, as the thicker spine would create a problem or obstacle with
most slicing and cutting chores and the edge would be too fragile for most
cutting tasks at such a narrow angle. A sharpening guide that temporarily clamps on the back of a knife
works in the same way and does make a very good sharpening system. There are
other systems used in holding the proper edge angle during sharpening and they
are all very useful.
Some years ago I noticed Ben
Dale at the knife show in Eugene, Oregon demonstrating his sharpeners. I didn't
stop at first because I have seen my share of pitchmen hawking their doodad
tools for sharpening knives and most make me shudder to see what they do to a
knife. During a quite time at my booth, I started thinking about what I saw and
it began to make sense so I went back for a better look. I have been sold on
this system ever since and have sold a number of them to satisfied customers for
several years. I personally find the Edge Pro system to be my favorite hand
knife sharpener. Although it does cost a bit more than some sharpeners, it is
easy to use, very accurate and built to last a lifetime.
The Edge Pro works very well on
the vast majority of knives with ease. The fact that you do not have to clamp
the blade at different locations and you can just move the blade along the shelf
is very efficient. The drawback is that some knives do not have a flat blade and
will rock back and forth, making it difficult to get a perfect edge angle.
Usually this is solved by making sure that the ricaso (that flat part just ahead
of the guard) is resting firmly on the shelf. Or you can put a narrow strip of
tape on the shelf or blade to support the blade edge to prevent the rocking. On
really small blades you may have to set the blade a little askew on the corner
of the shelf so that the stone does not abrade the shelf. Again using the ricaso
to hold things steady at the proper edge angle.
The Edge Pro sharpener, in my
opinion, is one of the best knife sharpeners ever invented. It normally comes
with a 180 grit stone and a 220 grit stone from the manufacturer. This system as
it comes may be all you would ever need for your kitchen knives, however I like
my knives sharper than that and if you can eliminate the burr that is developed
with the first stone, the edge is more durable. One of the systems that I offer
(Special) comes with a 220 grit stone, a 320 grit stone and also in addition a
800 grit stone for those of us who have to have that ultimate edge. The Edge-Pro
will give you a whole new perspective on what sharp is.
Most of us can train ourselves
to hold an approximate but constant angle while stroking a stone but it does
take some practice. I find that I am getting proficient enough at holding an
accurate edge angle but I would rather get to an even greater edge with little
effort?
Once you have chosen the best
edge angle and start to work, you should see that you are now removing the metal
just behind the projected edge. Do this on both sides and with a fairly course
stone until the new facets just come together to meet at the very edge. The best
way to tell when you have arrived at the edge is when you can no longer see the
edge while looking straight down at it or you can see or feel a burr all along
the edge. 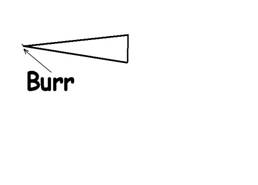 Unless
you want it to be a special purpose knife such as a patch knife or sushi knife,
sharpen evenly from both sides of the knife. If you do sharpen only one side,
use a somewhat steeper edge angle in order to get the proper final edge angle as
with a conventional blade.
Unless
you want it to be a special purpose knife such as a patch knife or sushi knife,
sharpen evenly from both sides of the knife. If you do sharpen only one side,
use a somewhat steeper edge angle in order to get the proper final edge angle as
with a conventional blade.
Most of the work will be done
with the course stone, one that moves steel quickly. Once you have obtained a
burr all along the entire edge with say a 120 or 220
grit stone, change to a finer 320 grit and using the same angle polish out the
course marks left by the first stone. The succeeding finer grits will require
very little work and will need very little pressure. If you desire a shaving
type edge, change to 800 grit and repeat the process. The wire edge burr will
get very thin with succeeding grits and will buff or strop off easily. I should
mention that a polished edge will be both sharper and more durable, because you
have a real edge instead of a thin wire burr that requires a steel to straighten
out as it folds back over the blade edge.
Sometimes it works better if the
last grit is set just a smidgen steeper with the last couple of strokes so as to
work on the edge only.
For a closer look at how an edge
will appear after using various size of grits read the article written by
Dr. John
Verhoeven.
Many professionals prefer a
double angle edge where the primary grinding is done at a very narrow angle to
thin the blade and the very edge is lightly touched with the steeper more
durable angle. This configuration coupled with proper blade geometry produces a
very good working knife that has reduced drag and an easy to maintain edge
between major sharpening.
For the power tool minded, there
are a wide variety of belt grinders and buffers. I have sharpened thousands of
knives over the past 31 years using this method. You really have to pay strict
attention to heat build up, as it is very easy to get the blade hot and ruin the
temper. There are other power tools designed for sharpening and the ones that
run slow and wet are among the best. The automatic knife sharpeners that you
insert the blade and pull through make me shudder, as they remove an excessive
amount of steel and never do get the blade sharp and can grind out deep scallops
in the knife. It reminds me a little of a kid with a pencil sharpener, soon you
have nothing but short pencils.
Heat is your enemy here and
needs careful watching. If you are grinding up on the thicker part of the blade,
as if in reducing the over all blade thickness, heat build up is not so
pronounced, because the heat has several directions to flow and there is mass
under the contact area for the heat to flow to. When you are grinding at the
edge of the blade there is very little mass to absorb the energy and only half
as many directions for heat flow. Grinding at the tip of the blade has to be
done with extreme care as the heat has no place to go.
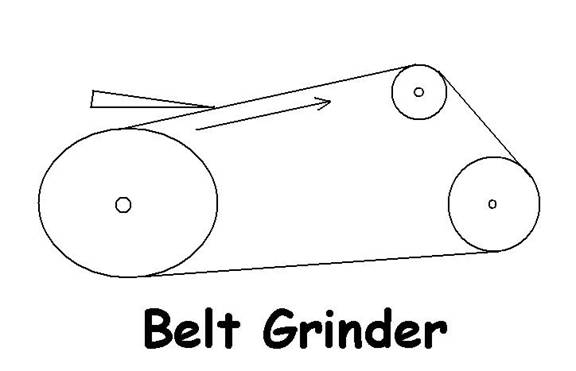
Belt grinders will produce a
much better finish than a hard wheel grinder, especially if you use the slack
part of the belt because it blends better. You can get a variety of grits from
course to fine. The most popular size for knife makers is the 2” times 72” belts
and they come in grits from 36 to 2,000 and no grit for rouge.
Use the slack part between the
contact and tracking wheels. I highly recommend that you let the belt run away
from the edge, as shown in the illustration, not into the edge. (install a motor
reversing switch on your belt grinder just for this job). I can hold the blade
somewhat horizontal with the motor in reverse and watch the burr pop up along
the edge as I grind in the bevels. Don’t place the blade edge into the running
belt as is done with the bench stone. If you do, you may actually cut into the
belt and bad things will happen at light speed. I have a big scar on my left
thumb for testimony.
If your belt runs vertical as in
most two wheel grinders, hold the edge down and let the belt run off of the
blade.
Determining the right angle to
hold the knife to the belt or stone can be done by actually setting the angle
with a protractor, until you get a feel for it. First set the blade edge on
something flat and using a protractor or other devise raise the back to 20
degrees or any other angle you want.
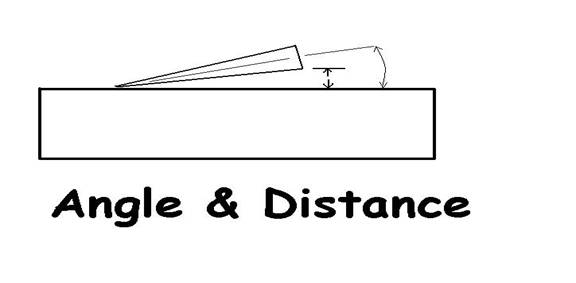
While the blade is at this angle
gauge the distance of back of blade to the flat surface and visually remember
this distance. Another useful trick that I use at times is to paint the
edge with a magic marker. You can tell at a glance just exactly where it is that
you are honing on the edge.
A quick angle to use is to
divide a right angle twice. 90/2 = 45, 45/2 = 22.5 for a really durable using
edge, however I like a sharper hunting knife so I would drop the blade down a
few degrees from that.
Now all you have to do is
remember the proper distance to keep the back of the blade from the stone or the
grinding belt. Take even passes from heal to point, alternating from one side to
the other, until you get a burr all the way along the edge from both sides. A
lot of blades will have a varying thickness along the edge and this will mean
more work in some areas, and maintain the same angle throughout. Do not change
grits until you have a burr formed from heal to point. Now you can change belts
or stone and repeat the process but take very light passes. Start with a 120
grit belt unless the knife is really bad and follow up with a 400 grit belt and
finish with a worn out belt that has been lubricated and rouged.
The same procedure goes for
sharpening by hand. Start with a course enough stone to remove the metal quickly
and follow up with the finer stones. Sharpening a dull knife, from the start,
with an Arkansas hard stone is akin to digging a basement with a teaspoon or
felling a giant redwood with a pocket knife.
Buffing the final edge is widely
practiced and does a very quick and efficient job of removing the final burr and
bringing up the edge. It needs to be done with care as well so that you do not
build up heat and remove the temper. The buffing wheel will conform to the shape
of the blade however and can run across the edge of the blade at an angle much
steeper than what you initially ground it to and ruin your efforts. To prevent
the buffer from destroying the edge, reduce the angle just a little that you
hold the blade to the buffing wheel but not so low as to let the buffer catch
the top of the blade either. Sometimes even I will lose the edge from over
buffing and will have to start from scratch. Buffing take a little practice but
the results are well worth the time spent learning. Buffing is also the most
hazardous work in the knife shop. A blade that is not presented to the buffer
properly can be caught by the buffer and thrown with great force.
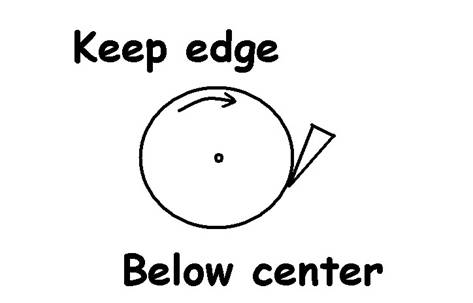
Things to remember when using
the buffer. Keep the blade below the center of the buffer shaft so that if it is
caught it will not be thrown directly at you. Keep the edge down and don’t let
the buffer drift up to the top edge of the blade and keep the point of the blade
down also. If your buffer catches the edge or the point of the knife it will get
a much better grip on the blade and may destroy the buffer pad to boot.
There are some more good rules
to remember.
Use a sewn buff, not a loose
buff and if you think you just have to buff a double edge blade check your
insurance policy first. Last but not necessarily least, slow your buffer down.
Do not use a 3600-rpm motor with a large wheel unless you really like to live on
the edge so reduce the speed down by belt and pulley. The larger the buffing
wheels the faster the surface travels at a given rpm, so don’t get carried away
with size. Get one large enough to clear obstacles like the motor, pulleys or
whatever and run it slow (1750 rpm). If you have a faster motor, use a smaller
buffing wheel and extend it with an adapter if necessary to clear the motor.
 By Lyle Brunckhorst of Bronk's Knifeworks, over 40 years of knife making and professional knife sharpening.